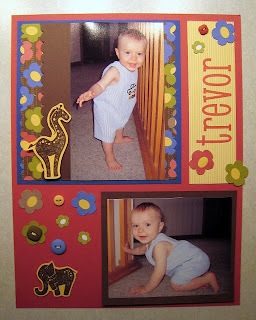
For the design I chose to use Tall Tales designer series paper and the coordinating Animal Stories stamp set. I love the combination for a boy's scrapbook page - cute but not too babyish. I chose the brightly colored flowers to highlight in the 6x6" page, since this versatile design will compliment almost any photo, and our workshop guests could then use their mini scrapbook page for whatever they wanted.
The fun designs of the Tall Tales paper and matching stamp set are great for kids, or any animal theme. It doesn't hurt that I love the rich, bright, but not overly-intense color scheme. These stamps and papers will be showing up in many of my future projects - I haven't even started working with the papers with the animal designs! I discovered that the Fresh Favorites II button collection have wonderfully coordinating (but not matching) colors, I'm sure I won't be able to stay away from them!
 But let's get down to business: To make a progressive scrapbook, start with a 6x6" page. Here are the supplies I used: Tall Tales designer series paper; Animal Stories stamps; Chocolate Chip, So Saffron, and Brilliant Blue card stock;Chocolate Chip stampin' pad; stampin' dimentionals; a scallop edge punch and a corner rounder punch (which I didn't use right away, you can see the rounded corners in the 12x12 photo below).
Tips:
- To save on paper, and to make the layout more flexible, cut strips of paper and card stock which are only 2" wide, then scallop and layer them. Note: this only works because all foreground elements are the same height in this layout.
- Make sure the subtle stripe in the background of the designer series paper runs vertically, in this vertical layout.
- Place the giraffe image on the solid Chocolate Chip background - the giraffe placed directly on the busy flowered background gets lost visually and loses all impact.
 Next I incorporated the 6x6" page into a larger 8-1/2x11" page. Supplies used include everything already mentioned, plus Ruby Red card stock and stampin' pad; Taffy alphabet stamp set; the Fresh Favorites II button set; and a stamp-a-ma-jig.
Tips:
 The final step for this scrapbook page is to incorporate the 8-1/2"x11" page into a 12"x12" page. Supplies used include everything listed before, plus Chocolate Chip 1" double-stitched grosgrain ribbon.
Tips:
- The name "Trevor" was stamped on designer series paper with a subtle So Saffron stripe pattern running horizontally. The stripe is now vertical in this layout.
- Use the stamp-a-ma-jig to line up and space letters evenly when stamping with an alphabet set. Also, start in the center of the paper and work outwards to center your word in the space provided.
- Cut flowers out of designer series paper. Two flower designs were used here.
- To make faux thread for the buttons, cut out tiny slivers of card stock and glue them in the button holes.
- Use very short pieces of ribbon between pictures to save on ribbon; or use one long strip of ribbon to make assembly easier.
- A wet glue will soak into a ribbon and show through. I used a glue stick on this project, but sticky strip adhesive might be an even better option.