Showing posts with label Workshop. Show all posts

Wednesday, October 6, 2010

October 2010 Newsletter - Halloween Treats


Halloween Treats

Just for fun, host a Halloween treats workshop! These projects are fast, fun, cute but just a tiny bit creepy.  Each guest will make a treat bag, 2 pencil toppers, and a pipe-cleaner spider which can be worn like a broach.  You'll also receive directions so you can make more of any of these projects at home.  

These little gifts are perfect for handing out at work, sending to school with your child, or even handing out on Halloween as an alternative to candy.  

Are you planning a Halloween party and you'd like to make these for party favors?  Invite your friends over and have a favor assembling pre-party party!  

Just one of my paper packs ($5) includes enough paper and card stock for 8 treat bags, 8 spider broaches, and 16 pencil toppers.  Additional materials include pipe cleaners, Halloween pencils, cello bags, ribbon, etc. - contact me for a complete list.  Buy two paper packs to make enough favors for 16 guests.  I have two different Halloween styles available.  

Schedule your free Halloween workshop before it's too late!  

Stamp 'n Watercolor Class

Wouldn't you like to take a little time out for yourself and try a new hobby?  Come to my class, relax with some friends, and enjoy watercoloring the easy way.  With stamps to make the design perfect every time, and Aqua Painters to take the mess out of watercolors, stamp 'n watercoloring becomes a very stress-free hobby.  

We will be making two Autumn-themed greeting cards, which can be used either for thank you cards or "thinking of you" cards,  and a Christmas-themed gift box.  We will be using Aqua Painters three ways:  to do detailed coloring, to give a casual painted effect, and to make a background.

Join me on October 23rd at 2:00pm for my class.  The fee is $20.00, which includes a set of two Aqua Painters and all the supplies to make the three projects.  Please sign up by October 14th so I can order your supplies in time. 


Calendar

Oct. 14: Stamp 'n Watercolor sign up
Oct. 14 6:30: Bracelet Club meeting
Oct. 23 2:00: Stamp 'n Watercolor class
Oct. 24 2:00: Freestyle Stamping Club
Nov. 18: Brayer Class sign up
Nov. 18 6:30: Bracelet Club meeting
Nov. 27 2:00: Brayer Class
Nov. 28 2:00: Freestyle Stamping Club
Dec. 9: Snowflake Ornament sign-up
Dec. 16 6:30 Bracelet Club meeting
Dec. 18 2:00: Snowflake Ornament Class
Dec. 19 2:00: Freestyle Stamping Club

Freestyle Stamping Club
Come to my Freestyle Stamping Club to give yourself a little crafting time and stamp with friends.  I will provide ink, some stamp sets, basic tools, and I will have paper packs available for $5.00.  Or bring your own materials, any brand.  There is no fee, and everyone is invited!  Please RSVP.  

Simply Adorned Bracelet Club
Come make a personalized, totally unique charm bracelet featuring your photos, your colors, and your style.  Club meetings will continue and rotate until everyone has a chance to make all three charm designs.  Contact me for prices.  

October Class - Stamp 'n Watercolor
Try something new!  With a stamp and an Aqua Painter it's hard to go wrong.  Come make a hand-painted card and gift box.  Class fee is $20 and includes an Aqua Painter set.  Please sign up by Oct. 14th so I can order your supplies.  

November Class - Using the Brayer
I'll show you tips and techniques to take you from "what is a brayer?" to becoming a brayer goddess.  We will be making a card and also a photo background suitable as a gift.  Class fee is $17 and includes a brayer.  Please sign up by Nov. 18th so I can order your brayer in time.  

December Class - Snowflake Ornaments
Become the King of Bling!  We will be using the Big Shot to make snowflake ornaments, and I will show you several techniques to make them glitter.  Class fee is $12 and includes rhinestones and pearls.  Please sign up by Dec. 9th.


Fabric!  

Stampin' Up! fabric is here!  For years we've asked for color coordinated fabric to match the inks, card stock, and designer papers from Stampin' Up.  Now we have two different fabric collections to choose from, and they're both beautiful.  

The Candy Cane Christmas fabric is bright and versatile.  The fabric patterns can be used for Christmas, or for cheerful cards or scrapbook pages for any season.  

Shown in the bottom left, the Deck the Halls fabric is elegant, a vintage style, and also can be used for any occasion.     

Our quality fabric can be used for traditional crafts such as sewing or quilting, but unlike at the fabric store, our fabric coordinates beautifully with our buttons and ribbon.  Plus, quilters love the amazing fabric-cutting Big Shot!

But fabric is also great for papercrafting.  I like to use it like a ribbon, as you can see in the pine cone card. I also use fabric like designer paper, as in the ornament card.  But fabric is most fun when used as fabric, like in the Christmas wreath and butterfly cards.  

Try using our new fabric for yourself!


Simply Adorned Bracelet Club

Are you thinking ahead to the holidays?  Are you going to need to come up with the perfect gift for your mother, sister, or mother-in-law?  I suggest the charm bracelet shown here - you can customize it with your recipient's favorite colors, photos of kids or grand kids, and of course a little bling.  

Join my Simply Adorned bracelet club, the meetings continue on the third Thursday of the month at 6:30pm.  Were you not able to make it to our first meeting?  No problem, club meetings will continue until everyone who wants a bracelet has a chance to make one.  This month we will be working with Itty Bitty stamps, punches, heat embossing, and tiny pearls and rhinestones.  

The club is free, but you will want to purchase the bracelet chain and one or two of the locket charms. (You can buy the next two charms in time for the next club meeting.)   As usual, if you order in time for your jewelry to arrive before the class, I will throw in a free filigree brad bangle.  Contact me for prices, or see my blog for more details.  


Charly Bratt
Independent Stampin' Up! demonstrator
(970) 206-9120
CharlysInkLink@gmail.com

Sunday, August 1, 2010

August 2010 Newsletter - Flip Open Mini Scrapbooks


Flip-Open Mini Scrapbook

I love the idea of giving hand made, personalized gifts at Christmas.  But in November, the last thing I have time for is dreaming up and putting together a craft project.  Which is why I'm offering this class now!  

Come to my class on Aug. 14th and we'll make this fun and amazing scrapbook.  It folds up into a little package - perfect for gift giving or mailing - but it opens out into many pages, even including extra slide out pages. 

You will finish this entire scrapbook in class (except for the pictures), and you'll also receive step-by-step instructions so you can make another copy or two at home.  

Stampin' Up! offers several different Simply Scrappin' kits, so you can make more flip-open mini scrapbooks with different themes and designs. The kit we will be using for our class is called "One Great Year", and it's perfect for boys, school aged kids from 5 to 25, or for any collection of pictures which spans a whole year.  

Be sure to sign up by Aug. 5th!


Punch Workshops

Have you ever looked through the Stampin' Up! catalog and been baffled by those professional-looking projects?  Have you ever thought "I could never make that!"?  Actually, you can, you just need me to show you the tricks and techniques.  

Host a workshop in August and I'll show you tricks to using Stampin' Up! punches, and how to make many designs using the same punch.  Everyone will make and take home the two cards shown here.  

August is the best time to host a workshop, since Stampin' Up! is giving qualifying hostesses an extra $25 in free merchandise!  See the promotions flier for more information, then give me a call.


Calendar

Aug. 5: Mini Scrapbook sign-up 
Aug. 14 2:00: Mini Scrapbook class
Aug. 15 2:00: Freestyle Stamping Club
Sept. 9: Scrap Card class sign up
Sept. 18 2:00: Scrap Card class
Sept. 19 2:00: Freestyle Stamping Club
Oct. 7: Stamp 'n Watercolor sign up
Oct. 16 2:00: Stamp 'n Watercolor class
Oct. 17 2:00: Freestyle Stamping Club
Nov. 4: Brayer Class sign up
Nov. 13 2:00: Brayer Class
Nov. 14 2:00: Freestyle Stamping Club

Freestyle Stamping Club
Come to my Freestyle Stamping Club to give yourself a little crafting time and stamp with friends.  I will provide ink, some stamp sets, basic tools, and I will have paper packs available for $5.00.  Any of my current customers are welcome to come - if you have purchased $15 or more from me from the Stampin' Up! catalog in the past 3 months, then you are one of my current customers.

August - Flip-Open Mini Scrapbook
This 5"x 6" flip-open mini scrapbook is a breeze to make with one of our Simply Scrappin' kits.  With 14 pages this unconventional scrapbook has a lot of room for pictures and journaling.  Class fee is $18.  Please sign up by Aug. 5th so I can order your kit.

September Class - Scrap Cards
Scrapbooks can be big, intimidating projects, but scrap cards (cards with photos and journaling) can be made in a snap!  Come learn to make 3 scrap card designs.  Class fee is $9.  Please sign up by Sept. 9th.  

October Class - Stamp 'n Watercolor
Try something new!  With a stamp and an Aqua Painter it's hard to go wrong.  Come make a hand-painted card and gift box.  Class fee is $20 and includes an Aqua Painter set.  Please sign up by Oct. 7th so I can order your supplies.  

November Class - Using the Brayer
I'll show you tips and techniques to take you from "what is a brayer" to becoming a brayer goddess.  We will be making a card and also a photo background suitable as a gift.  Class fee is $17 and includes a brayer.  Please sign up by Nov. 4th so I can order your brayer in time.  


Extra! Extra! 
Stampin' Up! hostesses get an extra $25 in free merchandise!

From now until August 31, Stampin' Up! hostesses can earn an EXTRA $25 to use toward Stampin' Up! products of your choice when you host a workshop totaling $350 or more.

This extra benefit is included along with the standard hostess benefits you receive when you host a workshop. The standard hostess benefits include:

 *  A free 2010-2011 Idea Book & Catalog worth $10.00
 *  Free stamp sets only available to hostesses 
 *  Free Stampin' Up! merchandise

Now when you host a workshop which totals $350, not only will you receive $40 in free Stampin' Up! merchandise of your choice, but you will also be given an EXTRA $25 for a total of $65 in free merchandise.  If your workshop totals more than that, your free merchandise totals will also increase.  See page 9 in the new Idea Book and Catalog, or ask me for more information.  But book your workshop soon, since your workshop must close by August 31st!  

New Color Give-Away

Have you seen the new Stampin' Up! colors?  They've refreshed their color collections, and I just love all the new additions!  From now until December 31st I'm offering this promotion:  For every $50 you spend on catalog purchases, I will give you one free Classic Stampin' Pad in your choice of the new colors.  

Can't wait?  Buy the Complete New Color Kit (shown here, $94.95), and get all the new Core colors at once.  I will then throw in 2 free Classic Stampin' Pads from the new In Colors OR $10 in free catalog merchandise, your choice.  

More new color sets are available - my favorite is the Stampin' Write Markers new color kit for $35.95.  Ask me for more information or see this link.  

Coupon Jackpot 

Host a private class, such as my new Flip-Open Mini Scrapbook class.  Hosting gets you many freebies, plus $5.00 for every new customer who signs up for my mailing list.
Bring a Friend and Earn $5.00

Come to one of my classes, workshops, or Freestyle Stamping Clubs and bring a friend!  For every new friend you bring me who signs up for my mailing list, I will give you a coupon for $5.00 off your next catalog purchase.

Want to hit the coupon jackpot?  Host a workshop or a private class and invite all your friends!  You'll earn a whole stack of coupons (good for your next purchase after your workshop), and your friends will see how much fun it is to stamp together.  Everyone needs a crafty girl's night out!  

Next up: My Freestyle Stamping Club, Aug. 15th at 2:00, open to everyone.  No fee, no planned project, no purchase necessary.  Either bring your own supplies and work on your own project, or buy one of my Paper Packs for $5 and work on that with my stamps and supplies.  And bring a friend!

Tuesday, February 2, 2010

February Featured Card

I love the pink and red glittery Valentine's Day projects I've been working on, but for the second half of February I thought I'd focus on something more subdued. The featured card for February is made with the Nouveau Chic designer series paper, which is so beautiful it's hard to choose which patterns to use.

This "happy birthday" card uses the Happy Moments stamp set, available for free as a Sale-A-Bration reward. The scalloped trim border punch is also a Sale-A-Bration reward, although it will be available in June with the new catalog.

If you would like to make this card call me and book a workshop. Get together with your friends, have a fun afternoon, and take home a handmade card!

 
Charly Bratt
CharlysInkLink@gmail.com
http://charlysinklink.blogspot.com/
http://www.charlysinklink.stampinup.net/

Thursday, January 21, 2010

Two Valentine Workshop projects to choose from

I just love holidays, and Valentine's Day is a particularly good one. What isn't there to like about chocolate, flowers, and pretty pink cards?

I designed two new projects for Valentine's Day, either of which would be fun for a workshop. Why not hold a workshop in January and make these mini Valentine's Day cards, and then have a friend hold another workshop in early February to make the matching box?

These mini cards are 3"x3", which is a cute size for a greeting card, or they work very well as a gift tag. Specialty envelopes which fit these cards exactly are also available.

In this workshop all guests would make all three cards. They feature two kinds of heart punches, a new border and corner punch, designer series paper, a comparison of wood-mounted to clear-mounted stamps, and more. This would be a slightly longer workshop - allow extra time to work on three cards. (If you need a shorter workshop we can do fewer cards.)

For my second project I have a box made out of card stock, sized to hold 3"x3" cards and their envelopes. It would be fun to make a set of 6 or 12 mini cards (you can use my designs above, or design your own), package them with matching envelopes, and then give this as a gift to a friend or sweetheart.

The mini cards and box are inspired by Valentine's Day, but they can be used for any occasion. The stamped messages can be changed to a "thank you" message, a "friendship" message, or other possibilities.

This box uses the new 5/8" satin ribbon which comes in coordinating Stampin' Up! colors, as well as the new extra-large Fancy Flower punch, border and corner punches, designer series paper, a comparison of wood-mounted to clear-mounted stamps, and a touch of Crystal Effects. I will also include instructions on how to assemble this box, so workshop guests can make more of these at home.

Drop me an email to set up your workshop today! In addition to these two projects I have many other themes available - we can make a scrapbook page, or birthday cards, thank-you cards, and more. Just let me know what you are interested in!

Charly Bratt
CharlysInkLink@gmail.com

Thursday, January 7, 2010

Mini Reese's Gift Box

This little Valentine's Day gift box is easy and quick to make, fun to decorate, and a surprise to whoever opens it. They won't be expecting the stamped message inside, with each letter on top of one mini Reese's Peanut Butter Cup! You can make this project at one of my workshops - just drop me an email at CharlysInkLink@gmail.com - or you can follow my directions below:


Supplies:
  • Whisper White card stock
  • Melon Mambo stampin' pad
  • Jayne's Type alphabet stamp set
  • Love You Much stamp set
  • Simply Said stamp set
  • 24" of Whisper White Organza ribbon
  • Fire Square Rhinestone brad in pink
  • Stamping Sponge
  • Sticky Strip
  • Stampin' Dimensional
  • 1-1/4" Circle punch
  • Heart punch
  • 1/16" hole punch
  • silver elastic cord
  • 12 Dark mini Reese's Peanut Butter Cups. Use the Dark ones because a) their brown wrappers don't clash with pink as badly, and b) they taste better!
Directions:
  1. First decorate your card stock. In this photo I took 8-1/2 x 11" Whisper White cards stock and ran it through my printer, using My Digital Studio to print the "Script" designer series paper design on it in Melon Mambo. If you don't have My Digital Studio, decorate a piece of card stock with stamped patterns. I suggest using a Melon Mambo sheet and stamping the large heart from Love You Much in Whisper White CRAFT ink.
  2. Next you will need to print or copy the pencil box template on the back of your decorated card stock. Contact me to get that template. You can then score and cut out the box shape, and assemble it with Sticky Strip.
  3. Stamp "LOVE U" on a piece of Whisper White card stock with Jayne's Type. Also stamp the circle flourish from Love You Much. Then punch out each letter, and the smaller circle from the flourish, with the 1-1/4" circle punch. Hold the punch upside down so you can properly center the image in the circle.
  4. With a wedge cut out of a Stamping Sponge, sponge a little Melon Mambo around the edges of each letter, to give it a softer look.
  5. Stick each letter and the flourish to a mini Peanut Butter Cup, using one Stampin' Dimensional each. Fill the box with 12 mini cups with the message on top.
  6. Stamp the flower heart and the word heart from the Simply Said set. Punch out the word heart using the Heart Punch, and carefully cut out the flower heart. Sponge some Melon Mambo around these hearts to help define their shape. This will be your tag, so you can write "To:" and "From:" inside the word heart. Layer the flower heart on top and inside the word heart.
  7. Choose the smallest of the pink Fire Square brads. You'll attach the two hearts at the point of the smallest heart, like in the picture. Start a hole for the brad with a paper piercer or the 1/16" hole punch. Once the brad is in make sure the two layers can swivel so the inside message is hidden and then can be revealed, and make sure the ends of the brad don't show when you have the tag the way you want to present it. Also, punch a 1/16" hole in the upper left to hang the tag from the box.
  8. Tie the Whisper White Organza ribbon around the box, and attach the tag to the ribbon with silver elastic cord.
Perfect! Give your valentine box to someone you love, or change the message to "THANKS", "XOXOXO", or "HUGS 4 U" and give it to a friend. This box is good for teachers, neighbors, friends, kids, or anyone else who needs a valentine.

Let me know if you need more tips, or if you would like to order any supplies. If you don't have all these supplies, you can make this box anyway using my supplies by hosting a workshop! Just drop me an email.

Charly Bratt
CharlysInkLink@gmail.com

Monday, July 13, 2009

Progressive Scrapbook

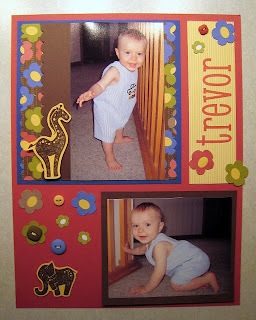
Yesterday I had a workshop at my friend Lyndy's house - I enjoyed meeting Lyndy's friends and family, and also getting to spend a little extra time talking with my friend Lisa. I demonstrated a progressive scrapbook page, which I find makes scrapbook layouts much easier.

For the design I chose to use Tall Tales designer series paper and the coordinating Animal Stories stamp set. I love the combination for a boy's scrapbook page - cute but not too babyish. I chose the brightly colored flowers to highlight in the 6x6" page, since this versatile design will compliment almost any photo, and our workshop guests could then use their mini scrapbook page for whatever they wanted.

The fun designs of the Tall Tales paper and matching stamp set are great for kids, or any animal theme. It doesn't hurt that I love the rich, bright, but not overly-intense color scheme. These stamps and papers will be showing up in many of my future projects - I haven't even started working with the papers with the animal designs! I discovered that the Fresh Favorites II button collection have wonderfully coordinating (but not matching) colors, I'm sure I won't be able to stay away from them!


But let's get down to business: To make a progressive scrapbook, start with a 6x6" page. Here are the supplies I used: Tall Tales designer series paper; Animal Stories stamps; Chocolate Chip, So Saffron, and Brilliant Blue card stock;Chocolate Chip stampin' pad; stampin' dimentionals; a scallop edge punch and a corner rounder punch (which I didn't use right away, you can see the rounded corners in the 12x12 photo below).

Tips:

  • To save on paper, and to make the layout more flexible, cut strips of paper and card stock which are only 2" wide, then scallop and layer them. Note: this only works because all foreground elements are the same height in this layout.
  • Make sure the subtle stripe in the background of the designer series paper runs vertically, in this vertical layout.
  • Place the giraffe image on the solid Chocolate Chip background - the giraffe placed directly on the busy flowered background gets lost visually and loses all impact.

Next I incorporated the 6x6" page into a larger 8-1/2x11" page. Supplies used include everything already mentioned, plus Ruby Red card stock and stampin' pad; Taffy alphabet stamp set; the Fresh Favorites II button set; and a stamp-a-ma-jig.

Tips:
The final step for this scrapbook page is to incorporate the 8-1/2"x11" page into a 12"x12" page. Supplies used include everything listed before, plus Chocolate Chip 1" double-stitched grosgrain ribbon.

Tips:

  • The name "Trevor" was stamped on designer series paper with a subtle So Saffron stripe pattern running horizontally. The stripe is now vertical in this layout.
  • Use the stamp-a-ma-jig to line up and space letters evenly when stamping with an alphabet set. Also, start in the center of the paper and work outwards to center your word in the space provided.
  • Cut flowers out of designer series paper. Two flower designs were used here.
  • To make faux thread for the buttons, cut out tiny slivers of card stock and glue them in the button holes.

  • Use very short pieces of ribbon between pictures to save on ribbon; or use one long strip of ribbon to make assembly easier.
  • A wet glue will soak into a ribbon and show through. I used a glue stick on this project, but sticky strip adhesive might be an even better option.
I hope this example inspires you to make a progressive scrapbook page of your own. Please contact me if you have any questions about what I did, or to order any of these supplies. Don't miss out on the new Animal Stories!