Supplies:
Card stock: Old Olive, Pretty in Pink, Whisper White, So Saffron
Ink: Old Olive, Pixie Pink, Orchid Opulence, Pretty in Pink, Chocolate Chip, So Saffron, Basic Black
Stamps: Taffy Alphabet (115086),
Happy Together (114314),
Hello Again (113870),
Eastern Blooms (111626),
Love Bug (hostess),
Country Morning (hostess),
Wings of Friendship (hostess),
The More the Merrier (hostess)
Shades of Spring DSP (117160)
Medium Window Sheets (114323)
Pretty in Pink 1/2" striped grosgrain ribbon (113882)
Crystal Effects (101055)
Dazzling Diamonds Glitter (102023)
Crop-A-Dile (108362)
1" circle punch (109046)
Corner rounder punch (109047)
Mini Glue Dots (103683)
Sticky Strip (104294)
Tombow Glue (110755)
Non-Stampin' Up! materials:
DVD tin - http://www.effectuality.com/
Large magnets - http://www.wholesalersusainc.com/
Steps:
- Begin by preparing and gluing the magnet backs, to give the glue time to dry. Decide on a stamp to use for the backs, and stamp that image 12 times on colored card stock. Punch those images out with the 1" circle punch. Lay out the magnets on the DVD tin, to keep the magnets from sliding towards and sticking to each other. Coat the backs of the card stock circles with Crystal Effects right out to the edges. Glue the card stock circles to the magnets. Set magnets (on the DVD tin) aside to dry.
- Cut a piece of card stock (either light colored or Whisper White) which is 5" x 7-1/8". Decorate this with a message and appropriate designs. Embellish with Crystal Effects and Dazzling Diamonds glitter, or other accessories.
- Cut two complementary patterns of designer series paper (DSP) to 5" x 7-1/8", plus two window sheets to that size.
- Using the corner rounder punch, round the corners of the cover sheet, the two sheets of designer paper, and the two window sheets.
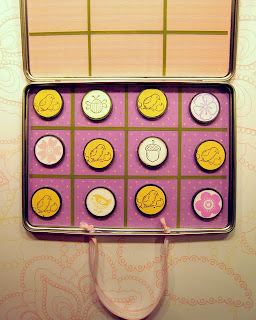
- Cut 4 strips of dark card stock to be 7-1/8" long x 1/8" wide. Cut 5 more strips of card stock to be 5" long x 1/8" wide. Carefully arrange these into grids on the DSP, making a 9 space Tic-Tac-Toe grid on one, and a 12 space Memory grid on the other. Glue the strips down by putting tiny dots of Tombow glue on the back sides of the strips, you only need to put a dot down every inch or so. The Window Sheets will protect the grids, so lots of glue is not necessary.
- Move the magnets off the DVD tin. Using your Crop-A-Dile, punch holes where the DVD tin opens, on the deep side (the base, not the lid) at about the 1/3 and 2/3 marks.
- On the cover side of the DVD tin, run Sticky Strip around the edges and in the center. Place the stamped cover on the DVD tin, remembering that the hinge is "down" and the holes for the carrying handle are "up".
- Inside the DVD tin, stick the DSP sheets down with Sticky Strip. I suggest you put the Memory board on the "deep" side, and Tic-Tac-Toe on the "lid" side, and plan to store the magnets on the Memory side.
- Make sure your window sheets are free of lint and tiny pieces of paper. Place a mini glue dot in each corner of the stuck-down DSP, and adhere the window sheets to the DSP.
- Cut a ribbon 10" long, push the ends through the holes, and tie small knots on the inside of the DVD tin to make a carrying handle. That should finish the travel game tin.
- Now finish your magnets. Choose 6 different stamp designs (which are different from the magnet back design), and stamp each design twice. I suggest using a different color of ink for each design, all on Whisper White card stock. Punch out all 12 with the 1" circle punch. You may choose to sponge the edges with the matching ink colors.
- Spread Crystal Effects glue on the back of the circles, one at a time, and glue each one to a magnet. Remember to check the magnet backs when applying the magnet fronts, so the orientation matches.
- Place your magnets in your game tin, dry side down. You're done!
- This game tin is fun for kids age 4 - 14, and everyone likes to play with magnets. Note: magnets are extremely dangerous if swallowed. Not for children under 4.
- To make a more "boyish" design, use Whisper White card stock for the cover, bugs instead of butterflies on the cover, green Shades of Spring designer paper on the inside, and Certainly Celery card stock with bugs instead of chicks on the backs of the magnets.
- Alter this design for any occasion or season. Use current designer series paper, and stamp any message on the cover.
- Use stamp sets that you own. Look through everything for small, kid-friendly images which would fit inside a 1" circle.
Independent Stampin' Up! Demonstrator
CharlysInkLink@gmail.com
http://charlysinklink.blogspot.com/
www.CharlysInkLink.StampinUp.net
Download this Google Doc here
Thanks to Donna Cook for the inspiration for this project.


No comments:
Post a Comment